Monday, January 26, 2015

FIRE!!!

Last December my church put on a Christmas Village in our Fellowship Hall.  We had a Tavern (our mainstage), game tent, craft tent, and photo booth.  It was a big hit in our community and I thought I'd share some of the stuff we put together for it.

First...

FIRE!!!!


Fire Pit


I made these two "fire pits" using the following materials***:


  • Batthery-operated fans (I got them for $2 each at Wal-Mart in November)
  • Battery-operated LED lights 
  • Window air conditioner insulation (one strip per pit)
  • Red, orange, and yellow tissue paper
  • Pipe cleaners (2 tied together)
  • Cardboard (2 large-ish pieces) to use as a base
  • Small sticks
  • Twine or fishing wire (optional)
Here's what I did:

1.  Tie two pipe cleaners together.  Make three of these for each fan.


2.  Cut various sizes of tissue paper to look like flames (I eyeballed it).  3 pieces total for each pit, I used orange for the large and medium sized flames, yellow for the small flame.  Here's a closeup to give you an idea:

3.  glue one flame to each twisted set of pipe cleaners (I used hot glue).

4.  place pipe cleaners around the fan and twist on under side.

5.  Trace a circle on a piece of paper.  I used a regular ol' large dinner plate.  You may need to make the circle larger.  In which case, take out your ruler and mark 2 inches or so out from that circle and cut the larger circle out.  Whatever the size, make sure there is room for the fan and a bit extra so lights can fit around the outside of the fan.  

6.  Hot glue the foam on the edge of the circle.  Cut off any extra.  I also left the ends unglued so I could run the light cord through.  That's optional, depending on the size of your pit and whether or not the battery pack fits in there nicely.  Mine didn't so I had to run it through to make it look better.

7.  Use a spare piece of foam to prop up the fan on one side if you use the type of fan I linked to above.  Glue in place on cardboard.

8.  Place strand of lights around and under the fan.  Run cord through space between insulation if desired.


9.  Crumple up some red or orange tissue paper (whatever looks better, I used red but might try with orange next time, especially if I use red lights again).  

10.  Uncrumple it and tape it around the fan so it covers the lights.  Play around with what looks right.  It's supposed to look like embers.


11.  Stack sticks like a tent above your pit.  Make sure not to block the "flames."

12.  Tie small piece of twine or fishing wire to hold up the sticks.

What I wish I had done differently:

1.  The fan doesn't have all that much power so the tissue paper barely moved.  Maybe find a stronger fan OR just attach the flames to something else w/o trying to use wind power.

2.  Use white lights instead of red.  With one of my pits I used red lights, one I used multi-colored lights.  The multi-colored actually looked better, but I think with the red tissue the white would be best.  Red lights made it look like lava....

3.  If I had time I would have cut up the foam to look more like rocks and pile them up.  It would take more materials but would probably have ended up looking more like a fire pit.  

*** I have not been paid to endorse any products.  

Friday, April 25, 2014

Under the Sea: Crochet Mermaid Photo prop

I recently was asked to crochet a photo prop based on this pattern by Wichecraft.  I mostly followed her instructions exactly, although I did the reverse on the flippers and increased instead of decreased because I wanted the right end of the flippers to face a certain way when folded over.  But really, if you do the pattern as written you'll get it!

Here's my finished project:


I can't wait to see pictures of it on the babe!

Sunday, December 29, 2013

Cross Stitch Mania!!

So I finished the Family Cross Stitch portrait I started yesterday (proof that this is one of the easiest projects you can do that your family will LOVE!!).  Here it is!!

I plan on framing it and hanging it somewhere in the house.


And, since my stitching fingers are on FIRE today, I wanted to create another pattern with Minions from Despicable Me.  I fell in love with something I found on Pinterest (see the end of this post) and created a Banana Song Minion Cross Stitch pattern.

You're welcome!

(also, for some reason in the pdf the tongue of the minion on the right is grey, but in all my files it looks pink... I can't give you an explanation for that, but just note that the tongue should be pink!)

And here is the original Pinterest post that inspired this pattern:

Friday, December 27, 2013

Cross-Stitch Family Portrait

So even though I'm not even cleaned up completely from my one year old's b-day party crafty stuff, nor have I even started putting away things from Christmas crafts, I'm starting another project!!

A few years ago, I made a cross-stitch of my husband's family.  This year, with the addition of our little guy, I decided to make one for our home.

Using Martha Stewart's templates as a jumping off point, I created my own pattern in Excel simply by setting equal width/height for the cells and filling the cells with the appropriate background color.  Then I added text using a pattern I created with the cross-stitch writing tool from stitchpoint.com.  I chose the Dublin font for this project.

Here is my finished pattern (the grey lines are there to mark the center and won't be in the finished product):


So tomorrow I'll be taking inventory of my random stash of sewing supplies and will probably make a visit to the craft store to get my fabric and whatever floss I need.


Tuesday, December 10, 2013

Deck the Halls With Boughs of... Skulls??

Here are the Kingsessing Morris Men posing with the reindeer scarf/wall hanging/whatever!  

Awesome reversible crocheted blanket!

Today I spent a cozy snow day finishing up a baby blanket for a friend who is going to have a baby soon.

I have a confession: I get tired of staring at the usual crocheted baby blankets.  They just look OLD to me!  Well, I found this idea of a reversible blanket that has fleece on the side.  With the right print, I knew I could update my favorite blanket pattern!

Here's the end result!


The how-to:

I used this pattern from Lion brand as a starting off point.  After finishing that, I picked out a fun fleece fabric, measured to the beginning of the first border round, cut to size, then hand stitched it to the blanket.  I then pinned the fleece to the fabric in alternating spots with straight pins and threaded my blue yarn through a tapestry needle.  Starting on one side of each straight pin, I put my needle through the fleece and crocheted side, then back through the crochet side and fleece on the other side of the pin.  I removed the pin and tied the two yarn ends in a knot.  I cut them to an inch in length.

Now I have a modern keepsake that is just so cuddly warm.  Unfortunately, it's not quite big enough for an adult to cuddle under - I tried!


Monday, December 9, 2013

Salt dough Handprint Keepsake

I can't find where this craft originated, but I saw this project floating around facebook and I thought I'd give it a whirl and make it festive for the holidays.  Here's the original project:

Directions:
1/2 c salt
1/2 c flour
1/4 c water ( give or take )
mix together, roll, press adults hand in first, then childs hand
bake @ 100 degrees for 3 hours

Paint desired colors.


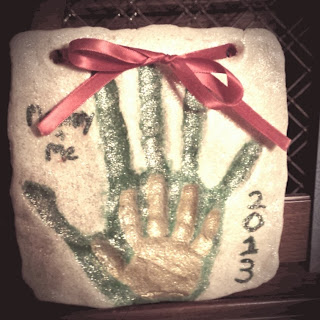
My final product:


A few notes:  
  • I don't know if the original creator of this project had mini hands, but one batch of this dough is not nearly enough for what they did!  I could barely fit my hand on here AND the holes for the ribbon!  So DOUBLE THE BATCH if you'd like to get anything more on here than what I did.
  • Toddlers just don't hold still for these sorts of projects.  So there's really no way it's gonna be perfect.  Just no way.
  • Leave lots of room for the holes.  I don't know if I'm going to test 'em by hanging this.  But if your plan is to hang make sure you use a wide ribbon (less chance of cutting through) and a thick amount of dough between the hole and the edge.
  • Cooking time may vary - I followed the directions exactly and the bottom side was nowhere near done!  I put the temperature of my oven up to 250 and baked it for maybe 2 hours more (I kept on checking every 30 minutes).
  • Glitter cures a multitude of ills.  I'm not sure I like my hand being green, but some nice gold glitter paint sorta toned it down!
  • I used the cheap Folk Art brand acrylic paints.  They worked just fine for this project.